728x90
[FND 활용]
0~9까지 카운팅(No interrupt)
#define F_CPU 16000000UL
#include <avr/io.h>
#include <avr/interrupt.h>
#include <util/delay.h>


// Segment 배열 선언 //
uint8_t seg_arr[] ={
	0x3f, 0x06, 0x5b, 0x4f, 0x66, 0x6d, 0x7d, 0x27, 0x7f, 0x67
};


int main()
{

	int count = 0;
	DDRA = 0xff;

	while(1)
	{
		PORTA = seg_arr[count];
		count = (count+1)%10; // 10으로 나눴을 때 나머지는 0~9이므로

		_delay_ms(500);
	}
}
0~9999까지 Count(No interrupt)
#define F_CPU 16000000UL
#include <avr/io.h>
#include <avr/interrupt.h>
#include <util/delay.h>

#define		FND_DATA_DDR	DDRA  // 데이터 포트
#define		FND_SELECT_DDR	DDRF  // 셀렉트 포트(자릿수 선택)
#define		FND_DATA_PORT	PORTA // 0 ~ 7
#define		FND_SELECT_PORT	PORTF // 0 ~ 4

// 디스플레이 함수 선언 //
void FND_Display(uint16_t data); // 8bit면 255까지밖에 없기 때문에, 4자리 다 쓰려고 16bit


int main()
{
	FND_DATA_DDR = 0xff; // 출력 모드
	FND_SELECT_DDR = 0xff; // 출력 모드
	FND_SELECT_PORT = 0x00; // 0부터 시작

	uint16_t count = 0;
	uint32_t time_tick = 0;
	uint32_t prev_time = 0;

	while(1)
	{
		FND_Display(count);
		// 시간 지연 함수 //
		// 딜레이 함수처럼 쓸 수 있는 함수 틱
		// delay 함수가 CPU를 많이 잡아 먹지 않도록 하기 위해 만든 함수
		if (time_tick - prev_time > 100)
		{
			prev_time = time_tick;
			count++; // 결국 카운트는 100ms마다 하나씩 올라감
			         // 잔상효과를 활용한 출력(1ms마다 FND_Display 함수 호출)
		}
		_delay_ms(1); // 1ms 시간 지연
		time_tick++; //
	}
}


void FND_Display(uint16_t data)
{
	static uint8_t position = 0;
	uint8_t fnd_data[] = {
		0x3f, 0x06, 0x5b, 0x4f, 0x66, 0x6d, 0x7d, 0x27, 0x7f, 0x67
	};

	switch(position)
	{
		case 0 : // 첫 번째 자리 -> 0번 pin Low, 나머지는 High  / 출력을 받아서 입력으로 넣어주면 회로 완성
		FND_SELECT_PORT &= ~(1<<PINF0);
		FND_SELECT_PORT |= (1<<PINF1) | (1<<PINF2) | (1<<PINF3);
		FND_DATA_PORT = fnd_data[data/1000];
		break;

		case 1 :
		FND_SELECT_PORT &= ~(1<<PINF1);
		FND_SELECT_PORT |= (1<<PINF0) | (1<<PINF2) | (1<<PINF3);
		FND_DATA_PORT = fnd_data[data/100%10];
		break;

		case 2 :
		FND_SELECT_PORT &= ~(1<<PINF2);
		FND_SELECT_PORT |= (1<<PINF1) | (1<<PINF0) | (1<<PINF3);
		FND_DATA_PORT = fnd_data[data/10%10];
		break;

		case 3 :
		FND_SELECT_PORT &= ~(1<<PINF3);
		FND_SELECT_PORT |= (1<<PINF1) | (1<<PINF2) | (1<<PINF0);
		FND_DATA_PORT = fnd_data[data%10];
		break;
	}
	position++;
	position = position % 4; // 4자리만 출력하고 다시 처음으로

}
		// 시간 지연 함수 //
		if (time_tick - prev_time > 5) 500ms마다 카운트 올라감.
		{
			prev_time = time_tick;
			count++;
		}
		_delay_ms(100); // 잔상효과를 눈으로 직접 확인 가능
                                // 100ms마다 FND_Display 함수 호출
		time_tick++;
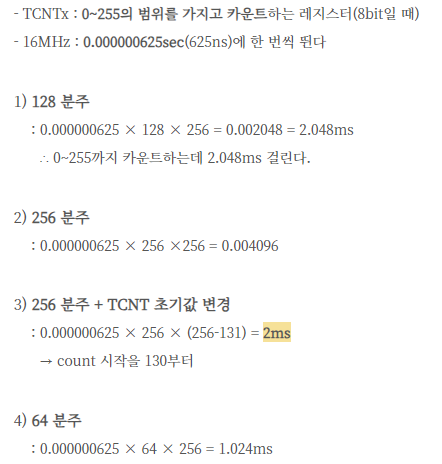
_delay_ms() 대신 Timer를 활용하여 Count
#define F_CPU 16000000UL
#include <avr/io.h>
#include <avr/interrupt.h>
#include <util/delay.h>

#define	FND_DATA_DDR	DDRA  // 데이터 포트
#define	FND_SELECT_DDR	DDRF  // 셀렉트 포트(자릿수 선택)
#define	FND_DATA_PORT	PORTA // 0 ~ 7
#define	FND_SELECT_PORT	PORTF // 0 ~ 4

// 디스플레이 함수 선언 //
void FND_Display(uint16_t data); // 8bit면 255까지밖에 없기 때문에, 4자리 다 쓰려고 16bit

uint32_t time_tick;
uint16_t count;

// Interrupt Service Routine 함수 선언 //
ISR(TIMER0_OVF_vect) // timer overflow interrupt가 발생할 때마다 실행
{
	TCNT0 = 131; // 131~255 범위에서 카운트
    time_tick++; // clock 1반복(131~255)당 time_tick++

	FND_Display(count);
	if(count<9999) // 9999 넘어가면, 0으로 초기화
	{
		if (time_tick == 5)  // 2ms마다 ISR 실행되므로 100ms마다 count++
		{
			count++;
			time_tick = 0;
		}
	}
	else count = 0;
}


int main()
{
	FND_DATA_DDR = 0xff; // 출력 모드
	FND_SELECT_DDR = 0xff; // 출력 모드
	FND_SELECT_PORT = 0x00; // 0부터 시작

	TCCR0 = (1<<CS02) | (1<<CS01) | (0<<CS00); // 256 분주
	TIMSK = (1<<TOIE0);	// Overflow interrupt enable

	sei(); // Global interrupt enable

	while(1)
	{}
}


void FND_Display(uint16_t data)
{
	static uint8_t position = 0;
	uint8_t fnd_data[] = {
		0x3f, 0x06, 0x5b, 0x4f, 0x66, 0x6d, 0x7d, 0x27, 0x7f, 0x67
	};

	switch(position)
	{
		case 0 : // 첫 번째 자리 -> 0번 pin Low, 나머지는 High  / 출력을 받아서 입력으로 넣어주면 회로 완성
		FND_SELECT_PORT &= ~(1<<PINF0);
		FND_SELECT_PORT |= (1<<PINF1) | (1<<PINF2) | (1<<PINF3);
		FND_DATA_PORT = fnd_data[data/1000];
		break;

		case 1 :
		FND_SELECT_PORT &= ~(1<<PINF1);
		FND_SELECT_PORT |= (1<<PINF0) | (1<<PINF2) | (1<<PINF3);
		FND_DATA_PORT = fnd_data[data/100%10];
		break;

		case 2 :
		FND_SELECT_PORT &= ~(1<<PINF2);
		FND_SELECT_PORT |= (1<<PINF1) | (1<<PINF0) | (1<<PINF3);
		FND_DATA_PORT = fnd_data[data/10%10];
		break;

		case 3 :
		FND_SELECT_PORT &= ~(1<<PINF3);
		FND_SELECT_PORT |= (1<<PINF1) | (1<<PINF2) | (1<<PINF0);
		FND_DATA_PORT = fnd_data[data%10];
		break;
	}
	position++;
	position = position % 4; // 4자리만 출력하고 다시 처음으로

}
※ stdint 자료형(uint8_t, uint16_t 등)을 왜 쓰는가?
| 데이터 종류 | 자료형 | 크기(Byte) | 크기(Bit) | 저장 범위 |
| 정수 | int | 4 | 32 | -2147483648 ~ 2147483647 |
| 실수 | double | 8 | 64 | -1.79 x 10^308 ~ 1.79 x 10^308 |
| 문자 | char | 1 | 8 | -128 ~ 127 |
| 문자열 | char 배열 | 가변적 | '배열의 크기-1' 개의 문자 | |
| 정수 | uint8_t | 1 | 8 | 0 ~ 255 |
| uint16_t | 2 | 16 | 0 ~ 65,535 | |
| uint32_t | 4 | 32 | 0 ~ 4,294,967,295 | |
stdint 자료형은 각 자료형의 bit 수를 고정한다.
모든 플랫폼에서 동일한 bit 수를 사용하게 된다는 의미이며,
그렇기에 어떤 플랫폼에서 프로그램을 실행해든 동일한 bit 수를 사용한 자료형을 쓸 수 있다.
▶ 이식성(Portability) 극대화
▶ 예를 들어, 임베디드처럼 메모리 사용의 관리를 비교적 많이 신경써줘야 하는 곳에서 이렇게 data type 제어 多
Interrupt를 활용한 FND Count
Button1 : start / stop
Button2 : Reset
#define F_CPU 16000000UL
#include <avr/io.h>
#include <avr/interrupt.h>
#include <util/delay.h>

#define		FND_DATA_DDR	DDRA  // 데이터 포트
#define		FND_SELECT_DDR	DDRF  // 셀렉트 포트(자릿수 선택)
#define		FND_DATA_PORT	PORTA // 0 ~ 7
#define		FND_SELECT_PORT	PORTF // 0 ~ 4

// 디스플레이 함수 선언 //
void FND_Display(uint16_t data); // 8bit면 255까지밖에 없기 때문에, 4자리 다 쓰려고 16bit

volatile uint32_t time_tick;
uint16_t count;
volatile uint8_t start_stop;


ISR(TIMER0_OVF_vect)
{
	time_tick++;
	if (count<9999)
	{
		if (time_tick == 50)  // 2ms마다 ISR 실행되므로 100ms마다 count++
		{
			count++;
			time_tick = 0;
		}
	}
	else count = 0;
}

ISR(INT4_vect) // start/stop
{
	if (start_stop%2)
		TIMSK = (1<<TOIE0);
	else TIMSK = (0<<TOIE0);
	start_stop++;
}

ISR(INT5_vect) // reset
{
	start_stop = 0;
	count = 0;
}

int main()
{
	FND_DATA_DDR = 0xff; // 출력 모드
	FND_SELECT_DDR = 0xff; // 출력 모드
	FND_DATA_PORT = 0x00; // 0부터 시작
	DDRE = 0x00;

	TCCR0 = (1<<CS02) | (1<<CS01) | (0<<CS00); // 256 분주
	TCNT0 = 131;
	EICRB |= (1<<ISC41) | (0<<ISC40) | (1<<ISC51) | (0<<ISC50);
	EIMSK |= (1<<INT4) | (1<<INT5);
	TIMSK = (1<<TOIE0);

	sei();

	while(1) // while문 내에서는 버튼을 받기 위해 기다려야 한다.
	{
		FND_Display(count);
		_delay_ms(1);
	}
}


void FND_Display(uint16_t data)
{
	static uint8_t position = 0;
	uint8_t fnd_data[] = {
		0x3f, 0x06, 0x5b, 0x4f, 0x66, 0x6d, 0x7d, 0x27, 0x7f, 0x67
	};

	switch(position)
	{
		case 0 : // 첫 번째 자리 -> 0번 pin Low, 나머지는 High  / 출력을 받아서 입력으로 넣어주면 회로 완성
		FND_SELECT_PORT &= ~(1<<PINF0);
		FND_SELECT_PORT |= (1<<PINF1) | (1<<PINF2) | (1<<PINF3);
		FND_DATA_PORT = fnd_data[data/1000];
		break;

		case 1 :
		FND_SELECT_PORT &= ~(1<<PINF1);
		FND_SELECT_PORT |= (1<<PINF0) | (1<<PINF2) | (1<<PINF3);
		FND_DATA_PORT = fnd_data[data/100%10];
		break;

		case 2 :
		FND_SELECT_PORT &= ~(1<<PINF2);
		FND_SELECT_PORT |= (1<<PINF1) | (1<<PINF0) | (1<<PINF3);
		FND_DATA_PORT = fnd_data[data/10%10];
		break;

		case 3 :
		FND_SELECT_PORT &= ~(1<<PINF3);
		FND_SELECT_PORT |= (1<<PINF1) | (1<<PINF2) | (1<<PINF0);
		FND_DATA_PORT = fnd_data[data%10];
		break;
	}
	position++;
	position = position % 4; // 4자리만 출력하고 다시 처음으로

}
ATmega_count_FND4_9999_BTN4.mp4
4.06MB
728x90


